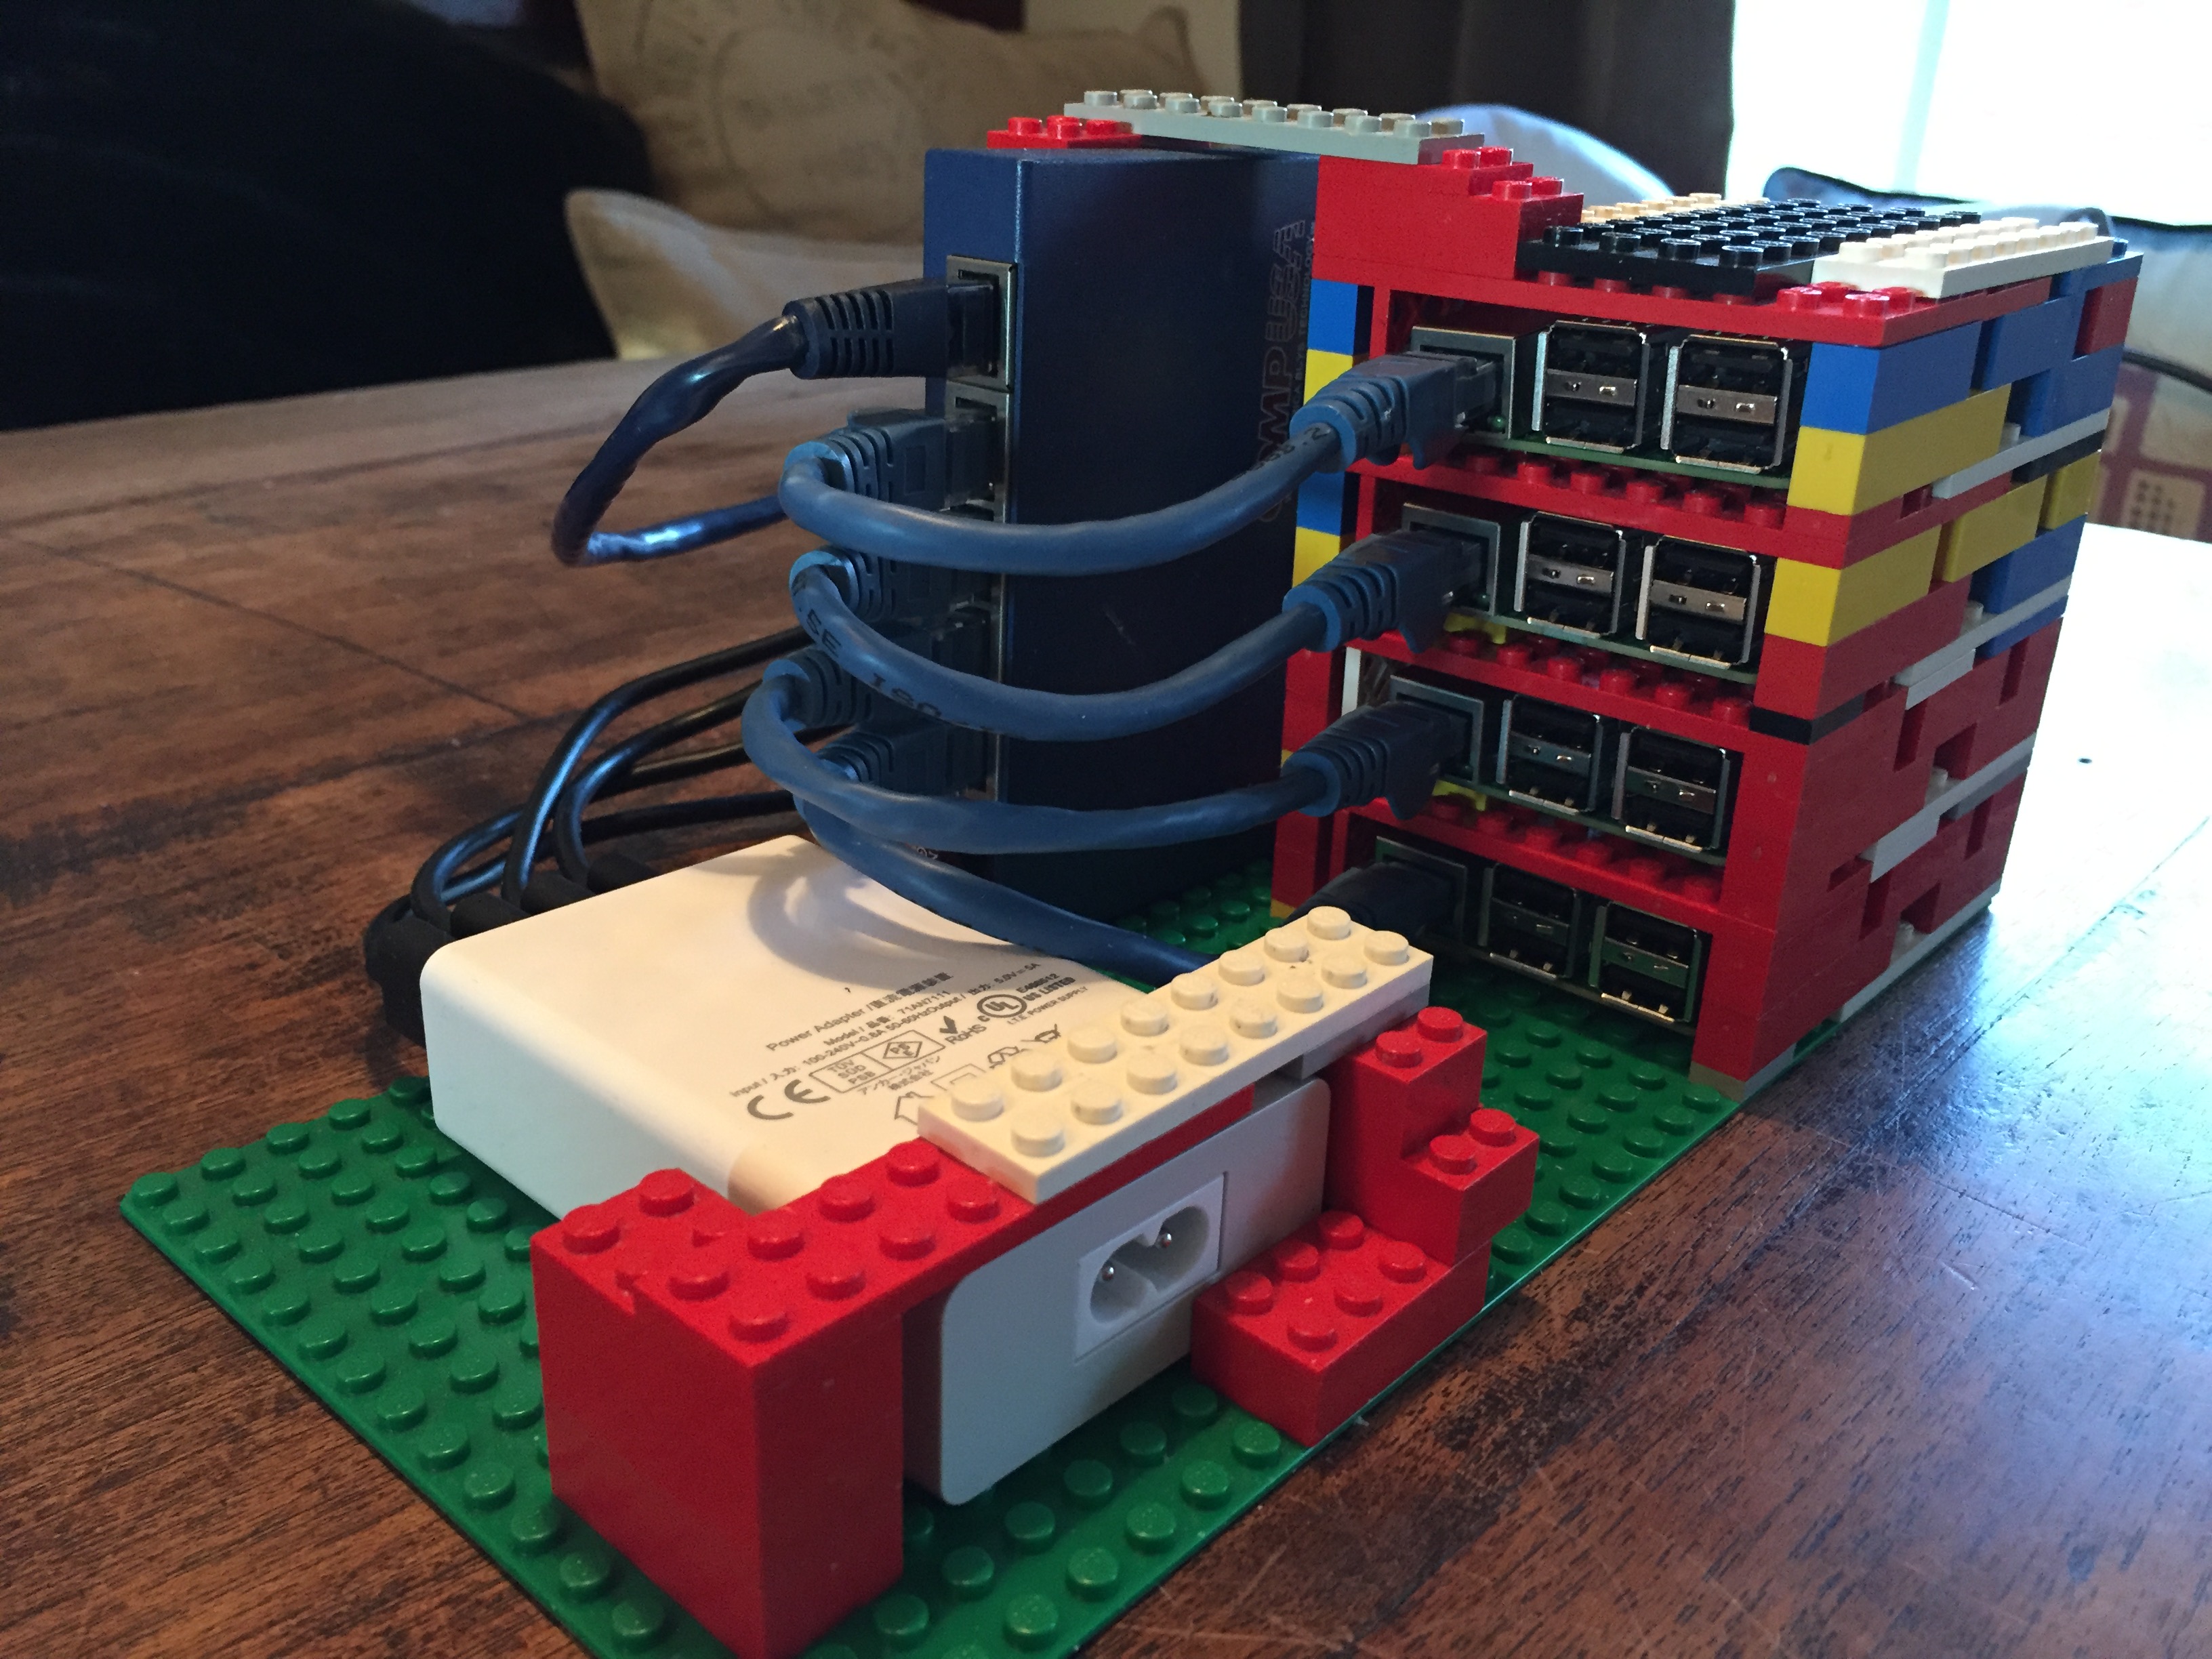
Do you want your own your very own cloud? Now you can! You can create your own data-center-in-a-box using nothing but cheap open source hardware and open source software. In this article I used 4 Raspberry Pi 2’s and I spent about $200. I’m using the Kubernetes cloud operating system, and I’m using Fabric8 to build and deploy and manage my micro services. Fabric8 is an integrated open source DevOps and Integration Platform which works out of the box on any Kubernetes or OpenShift environment and provides Continuous Delivery, Management, ChatOps and a Chaos Monkey. In short: the best framework there is to develop and manage your micro-services on.
Never before was there a better match between the software architecture and the hardware it runs one. The Pi’s are completely silent (no fan) and have a quite powerful quad core CPU, while the micro-services architecture makes each process relatively small so it can run on the 1 GB RAM memory contraint of each node. You can simply add more Pi’s if you need more computing power. Finally it is just plain fun to play with the hardware rather then logging into a remote virtual machine at Amazon.
Disclaimer: I work on the Red Hat Fabric8 project.
1. Required hardware
To build this 4 Pi setup I used
-
4 Raspberry Pi 2 with a quad core CPU and 1 GB of RAM
-
4 16 GB MicroSD cards - class 10
-
1 60 W power supply with USB outlets
-
4 short USB to Micro USB cables for powering the Pi’s
-
4 short cat 5 network cables
-
1 longer cat 5 network cable to hook into your network
-
1 network hub (mine is an old 5 port 10/100 Mbs I dusted off)
-
Lego’s from your childhood. Just get creative. Trust me it feels good to build your own!
It is important to get class 10 MicroSD cards as this is the one component that affects the speed of the system greatly. You can easily get away with a smaller 20W powersupply for 4 Pi’s, I’m planning on adding more Pi’s later so I got a bigger one.) The network port on the Pi is 100 Mbs, so you can use your old hub.
2. Flashing the MicroSD cards
The first thing we need to do now is to get the operating system onto the MicroSD Cards. I’m using an Hypriot image. I did test a bunch of different images [1] including Pidora, Redsleeve/Centos7, ArchLinux, but concluded that Hypriot is the best for me at this point. Mostly because of the native Docker support and the image being small. You can download the latest hypriot image from [2]. The following instructions are OSX specific.
-
Insert the memory card in the card reader.
-
Unmount the card (using the du utility)
-
sudo dd bs=1m if=hypriot-rpi-20151103-224349.img of=/dev/disk2
-
wait .. this may take 10 minutes or so.
Do this for all 4 MicroSD cards. You can work on your lego casing while waiting.
3. Power up and add DNS
You can now power up the first Pi. By default to login use root/hypriot. You will need to set up DNS for each of the Pi’s. If you don’t want to hook up a monitor and keyboard to login at the console to figure out its IP and Mac address, then you can use nmap [3] to figure this out. If you have a DNS service provision it there, or else name the Pi’s in /etc/hosts. I named my Pi’s rpi-master, rpi-node-1, rpi-node-2 and rpi-node-3. With a quick reboot of each Pi you will see the names reflected at the cmd prompt. Note that if you skip the DNS step your Kubernetes cluster will not work. I added the following to my /etc/hosts files on all machines
192.168.1.9     rpi-master
192.168.1.21    rpi-node-1
192.168.1.18    rpi-node-2
192.168.1.23    rpi-node-3
4. Add Swap (optional)
I added 1Gb of swap space to my rpi-master because it runs a few more Kubernetes components. Some people seem concerned that frequent writes to the MicroSD card will make it fail quickly. I therefore decided to set the 'swappiness' such that it only uses the swap as a last resort.
    dd if=/dev/zero of=/swap/swapfile bs=1M count=1024
    mkswap /swap/swapfile
    swapon /swap/swapfile
Now you can check with 'top' that you have a 1 GB of swapspace
KiB Mem:    947468 total,   913096 used,    34372 free,    69884 buffers
KiB Swap:  1048572 total,      484 used,  1048088 free,   667248 cached
To make the swap permanent between reboots add
/swap/swapfile none swap sw 0 0
to you /etc/fstab file. Finally in the /etc/sysctl.conf I’ve set the swappiness to 1 to make it not very 'swappy'
vm.swappiness = 1
'1' means it will only use swap when the RAM use gets over 99%.
5. Install Kubernetes
These instructions are to install the plain vanilla Kubernetes from Google. I had some issues compiling Openshift v3 due to some 64 bit dependencies, and I will get back to that later. I would like go support both. All the code that I’m using is checked in under https://github.com/Project31. If you want to compile your own Kubernetes binaries then visit [4].
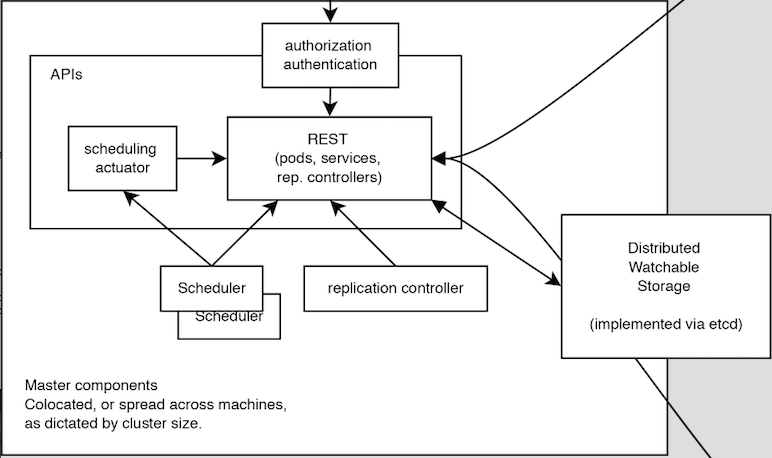
5.1. Install Kubernetes Master
The Kubernetes master runs the kubernetes REST API, a scheduler, kubernetes-proxy, a replication controller, and it uses etcd as a key-value store that is replicated with between other Kubernetes masters. For more details please see the Kubernetes documentation at [5].
To install these components onto the master, login to the master node and run
    git clone git@github.com:Project31/kubernetes-installer-rpi.git
    cd kubernetes-install-rpi
    ./build-master.sh
Verify the running docker containers using docker ps
CONTAINER ID        IMAGE                                             COMMAND                  CREATED             STATUS              PORTS               NAMES
d598e486daf5        hyperkube                                         "/hyperkube proxy --m"   3 days ago          Up 3 days                               k8s_kube-proxy.77350919_kube-controller-rpi-master_default_2d7688bceff12d2c89bf40c848f6e4dd_834f658a
026c19a67f86        hyperkube                                         "/hyperkube scheduler"   3 days ago          Up 3 days                               k8s_kube-scheduler.9eefe01e_kube-controller-rpi-master_default_2d7688bceff12d2c89bf40c848f6e4dd_1dd7c2e9
8f615b87cfda        hyperkube                                         "/hyperkube controlle"   3 days ago          Up 3 days                               k8s_kube-controller-manager.ff35e738_kube-controller-rpi-master_default_2d7688bceff12d2c89bf40c848f6e4dd_3a793f6d
a737d9927c03        hyperkube                                         "/hyperkube apiserver"   3 days ago          Up 3 days                               k8s_kube-apiserver.41110286_kube-controller-rpi-master_default_2d7688bceff12d2c89bf40c848f6e4dd_9ce28f62
0207a21ce18d        etcd                                              "etcd --data-dir=/var"   3 days ago          Up 3 days                               k8s_etcd.23d7fc08_kube-controller-rpi-master_default_2d7688bceff12d2c89bf40c848f6e4dd_9cd6d801
a4174bf7cb98        gcr.io/google_containers/pause:0.8.0              "/pause"                 3 days ago          Up 3 days                               k8s_POD.e4cc795_kube-controller-rpi-master_default_2d7688bceff12d2c89bf40c848f6e4dd_6882abfe
and the now set export KUBERNETES_MASTER=http://rpi-master:8080 so your kubectl can connect the kubernetes REST API on the master. Now let take a look at the running pods using kubectl get pods
NAME                         READY     STATUS    RESTARTS   AGE
kube-controller-rpi-master   5/5       Running   0         10s
We can see that the kube-controller-rpi-master pod contains runs 5 docker containers with the Kubernetes services mentioned above.
5.2. Install Kubernetes Node
The Kubernetes node only run the kubernetes proxy and the pods.

To install these components on a node, login to the node and run
    git clone git@github.com:Project31/kubernetes-installer-rpi.git
    cd kubernetes-install-rpi
Now edit the kube-procy.yaml and set "--master=http://rpi-master:8080" to your kubernetes master. Then edit the kubelet.service file and set your master’s Kubernetes REST endpoint there as well. (which in my case is http://192.168.1.9:8080).
Now you can run the install
./build-worker.sh
and verify our proxy came up using docker ps
CONTAINER ID        IMAGE        COMMAND                  CREATED             STATUS              PORTS            NAMES
cf4a9a2d7f35        hyperkube    "/hyperkube proxy --m"   40 seconds ago      Up 37 seconds                        k8s_kube-proxy...
d9f8f937df4d        gcr.io/go... "/pause"                 43 seconds ago      Up 40 seconds                        k8s_POD.e4cc..
The proxy is running! Set export KUBERNETES_MASTER=http://rpi-master:8080 so your kubectl can connect the kubernetes REST API on the master. Now verify the nodes are all registered
kubectl get nodes
NAME         LABELS                              STATUS
rpi-master   kubernetes.io/hostname=rpi-master   Ready
rpi-node-1   kubernetes.io/hostname=rpi-node-1   Ready
rpi-node-2   kubernetes.io/hostname=rpi-node-2   Ready
rpi-node-3   kubernetes.io/hostname=rpi-node-3   Ready
Yay it worked!
6. Open Docker for remote connections.
Finally, on the master we need to fix up the Docker configuration so it accepts remote connections, so we can deploy something to it. Open the /etc/default/docker file for editing and set the DOCKER_OPTS
DOCKER_OPTS="-H tcp://192.168.1.9:2375 -H unix:///var/run/docker.sock --storage-driver=overlay -D"
where the IP address of machine, or you can user '0.0.0.0' to bind to all interfaces. Now we can remotely push docker images to the master. In my next post I’m going to deploy a fabric8, note that the docker images you want to run need to be based on an ARM architecture or else they won’t run!
7. Deploy a simple service
Let’s deploy a simply service, and scale to two pods to make sure things are working correctly
kubectl -s http://localhost:8080 run httpd --image=hypriot/rpi-busybox-httpd --port=80
kubectl scale --replicas=2 rc httpd
kubectl get pods -o wide
We see that eventhough we executed the command on the master is started a pod on node-2 and node-3.
NAME                         READY     STATUS    RESTARTS   AGE       NODE
httpd-4v1qw                  1/1       Running   0          9m        rpi-node-2
httpd-qxcxu                  0/1       Pending   0          16s       rpi-node-3
kube-controller-rpi-master   5/5       Running   0          1d        rpi-master
kube-system-rpi-node-1       1/1       Running   0          33m       rpi-node-1
kube-system-rpi-node-2       1/1       Running   0          43m       rpi-node-2
kube-system-rpi-node-3       1/1       Running   0          53m       rpi-node-3
That’s it for now. In the next blog post I will talk about deploying fabric8 services.
8. Conclusion
First of all: it works! The kubernetes master may not have much memory left to run services, the nodes on the other hand have almost the entire 1 GB available for docker containers. And if you need more computing power you can simply add nodes. The extremely low price of this hardware platform combined with the Kubernetes cloud OS and the Fabric8 devops and iPaas capabilities make this truly disruptive technology; it truly is a 'cloud-in-a-box' for 200$.